Instructions
How to Obtain Cells for Rings and Jewelry
To create your personalized ring or jewelry piece with your cells or those of a loved one, we will send you our cell isolation kit with instructions. Using this kit, you’ll collect at least 30 pulled hairs with roots and return them to us in the included pre-paid envelope. Properly obtaining hairs with root material is essential, as improperly collected samples may result in unsuccessful cell isolation.
On this page, you’ll find detailed instructions, including essential do’s and don’ts, to ensure the best results. If the first attempt is unsuccessful, we’ll provide a replacement isolation kit free of charge, along with additional guidance based on our findings.
Key Tips for Successful Sampling
Please make sure to fully read the instruction manual that you receive with your kit: full manual.
1. Choosing the right area to get hairs from
We have found that short hairs (max. 1.5 cm/0.5 inch) are easier to handle and that specific areas work better than others:
- For men, hair from the face (e.g., beard or mustache), scalp, or the crotch area
- For women, hair from the legs, scalp, or the crotch area
When the hair is longer than 1.5 cm/0.5 inch, it needs to be cut after pulling so that it is less than a third of the liquid in the tube, but shorter is better.
These areas typically have strong, stubborn hairs, which are ideal for thick roots. Additionally, they are often already shaved and maintained, making it easier to grow short hairs by simply shaving the area about a week before receiving the isolation kit (with exception of the scalp).

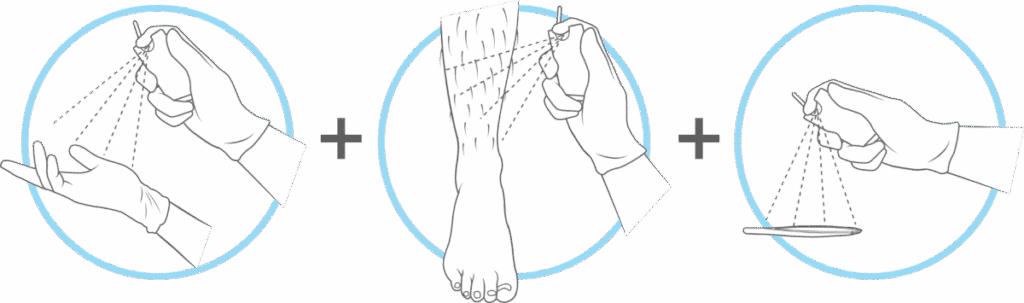
2. Disinfect Hands, Tools, and Skin Thoroughly
Human skin and hair naturally harbor microorganisms, which must be removed to prevent sample contamination. Generously apply the included disinfectant, rubbing it over your hands, tweezers, and the hair-pulling area. Allow it to dry for a few minutes before proceeding.
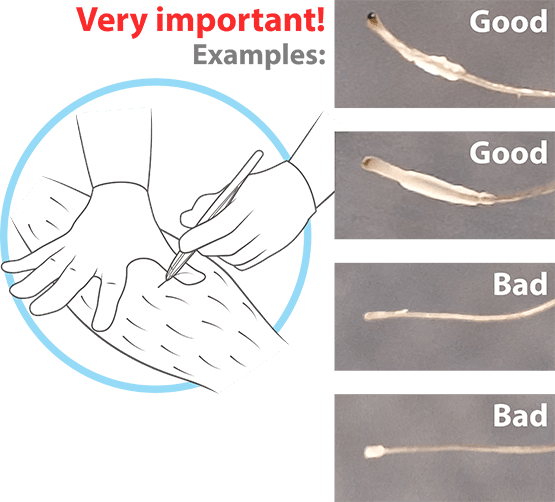
3. Collecting only the good hairs
Not every pulled hair will be a good one. In fact, many may lack a root and cannot be used.
Good hairs with a root look like the good example images. Per hair it will look a bit different, but there should be some whitish material on one end of the hair. Hairs without a root as shown in the bad example images should be discarded.
The chance of pulling hairs with roots varies widely—sometimes 1 in 2 hairs will have a root, while in other cases, it may be as few as 1 in 20, depending on the pull location and individual factors like age, sex, and lifestyle. If you only get bad ones, try another location.
4. The hairs with root must be properly transferred into the tube
Transferring pulled hairs into the tube can be tricky, as they will likely stick to the tweezers. Watch our video below for guidance on how this can be done easily.
In general, you can stick the root of the hair to the inside of the tube. With more hairs inside, you can also stick hairs on top of each other. Just make sure that they deep enough in the tube and are not coming outside the tube. Otherwise, it is required to cut them.
Once all hairs are in the tube, tightly close the cap and mix the tube so the liquid collects as many hairs as possible.
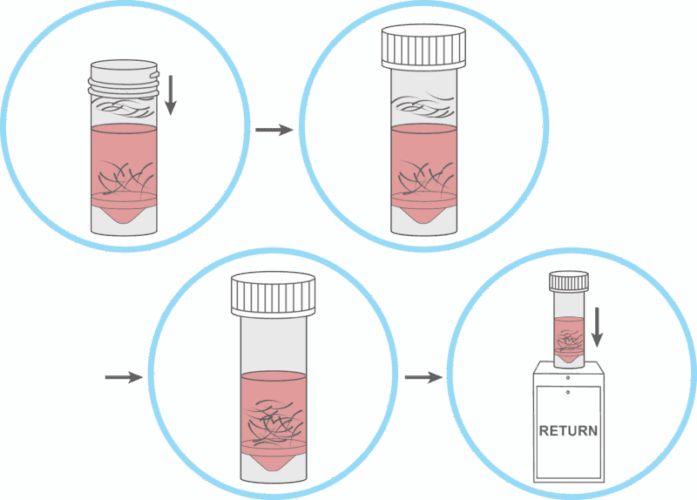
5. Once collected, send the sample as soon as possible
The samples you send contain your cells, which are living material and need to be handled promptly to preserve their quality.
It’s fine to keep them at room temperature for 1–2 days, but remember that shipping will also take time.
We recommend taking the envelope to your nearest post office as soon as possible.
Avoid using outdoor mailboxes or packing stations, as outside temperatures could damage the hairs. If there is no other choice, ensure it becomes not below 10°C/50°F or above 37°C/98.6°F outside.

Video instructions
Watch the video below for a simple, step-by-step guide on completing the sampling process and returning the tube in the provided pre-paid envelope.
Don’t Risk Him/Her Feeling Anything Less Than Special—Create the World's Most Unique Ring and Jewelry with Cellstones.
The most important things in life are those you care about—your special somebody. With Cellstone jewelry, you can gift something truly one-of-a-kind, created from the essence of your being.
Goldsmith/Jeweler Instructions
We provide guidelines and recommendations, developed in collaboration with our partner goldsmith, to help both goldsmiths and jewelers seamlessly incorporate Bio Bling’s unique Cellstones into the final jewelry pieces.1. Choose a setting style
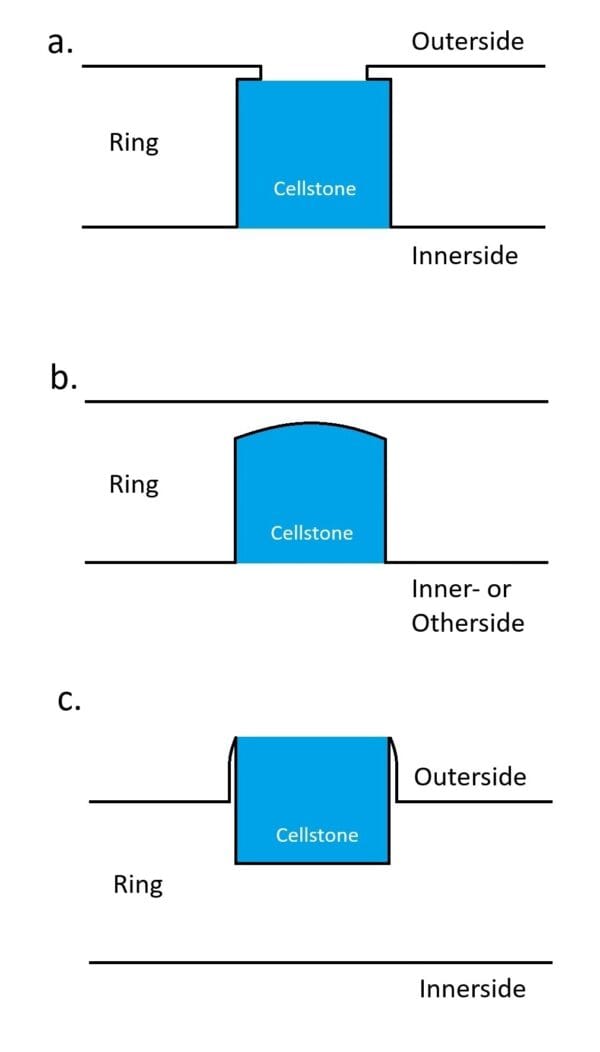
We recommend the following main setting styles. Others are also possible at your discretion and that of your goldsmith or jeweler.
Through hole with an edge on the outer side
The Cellstone is visible from both the outside and the inside. The small indentation secures the stone and offers partial protection against minor bumps.
- The ring should be at least 2 mm wider than the Cellstone’s diameter, subject to the goldsmith’s or jeweler’s discretion.
b) One-sided setting.
Visible from one side only, the Cellstone can be set on the inside of the ring for a discreet look.
- The ring should be at least 1 mm wider than the Cellstone’s diameter, subject to the goldsmith’s or jeweler’s discretion.
c) Bezel setting.
Placed on top of the ring band for emphasis of the Cellstone.
- The ring should be at least 1 mm wider than the Cellstone’s diameter, subject to the goldsmith’s or jeweler’s discretion.
2. The hole is drilled and the metal fully polished
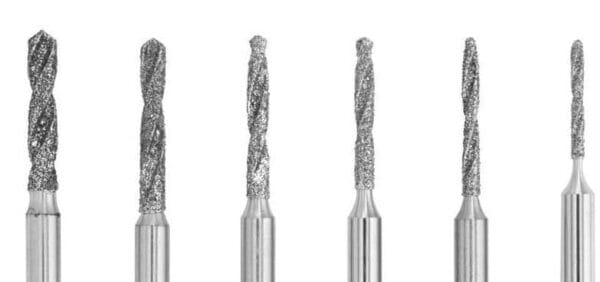
a) Once the setting style is decided, the hole in the ring can be drilled using a carbide drill bit or a ball end mill.
b) The metal of the ring or jewelry piece must be fully polished before the Cellstone is set, using traditional metal‑polishing techniques. Metal and resin require different polishing methods; polishing them together will leave metal residue on the Cellstone and make it appear dirty.
3. Incorporate the Cellstone into the ring or jewelry item
a) The Cellstone is sawn or cut to a length that fits the previously drilled hole. A small excess length should be kept to ensure it is not too short; this will be removed later (see our demo Cellstone setting ring image)
b) A two‑component adhesive suitable for metals (e.g., UHU Plus schnellfest transparent) is applied to the hole. The Cellstone is then pressed into place and any excess adhesive is removed. Allow to cure according to the manufacturer’s instructions.

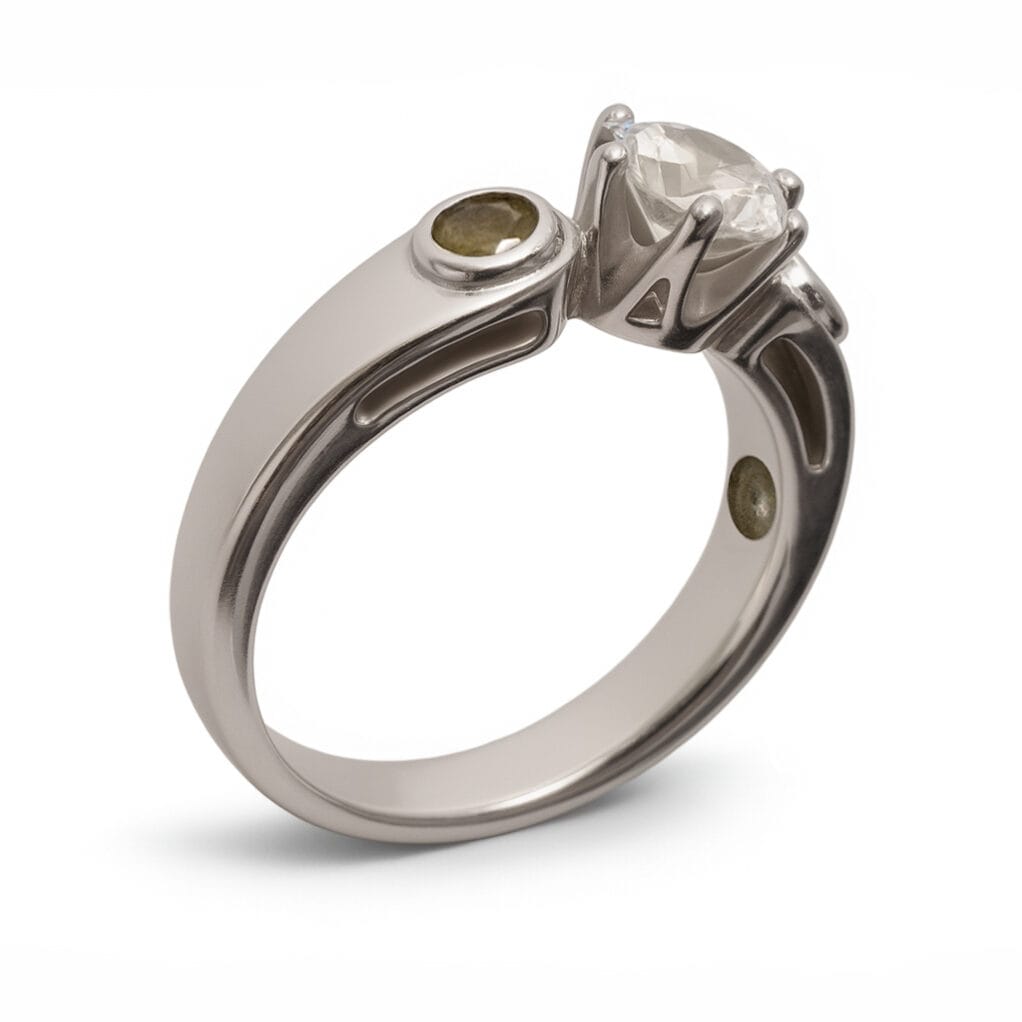
Demo ring with multiple settings
4. Sand and polish the Cellstone.
a) The excess Cellstone is removed as close as possible to the metal using a diamond cutting disc or fine carbide burr. Painter’s tape can be applied around the Cellstone to protect the metal.
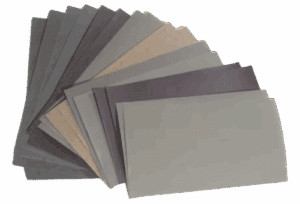
b) The Cellstone is then wet sanded and polished with pre wetted sanding papers in the following sequence: 400 → 800 → 1000 → 1200 → 1500 → 2000 → 3000 grit. The protective tape should be checked—and replaced if needed—especially at the lower grits to avoid scratching the metal.
c) Do a final polish with polishing pate for plastics (e.g., EPODEX polishing paste) to remove 3 µm deep scratches, followed by paste (e.g., 3M 09639 Finesse‑it Polish) to remove final scratches of <0.5 µm.
5. Clean the completed ring
Finally, the completed ring is cleaned with a soft cloth and a suitable cleaning agent to remove all traces of sanding debris and adhesive
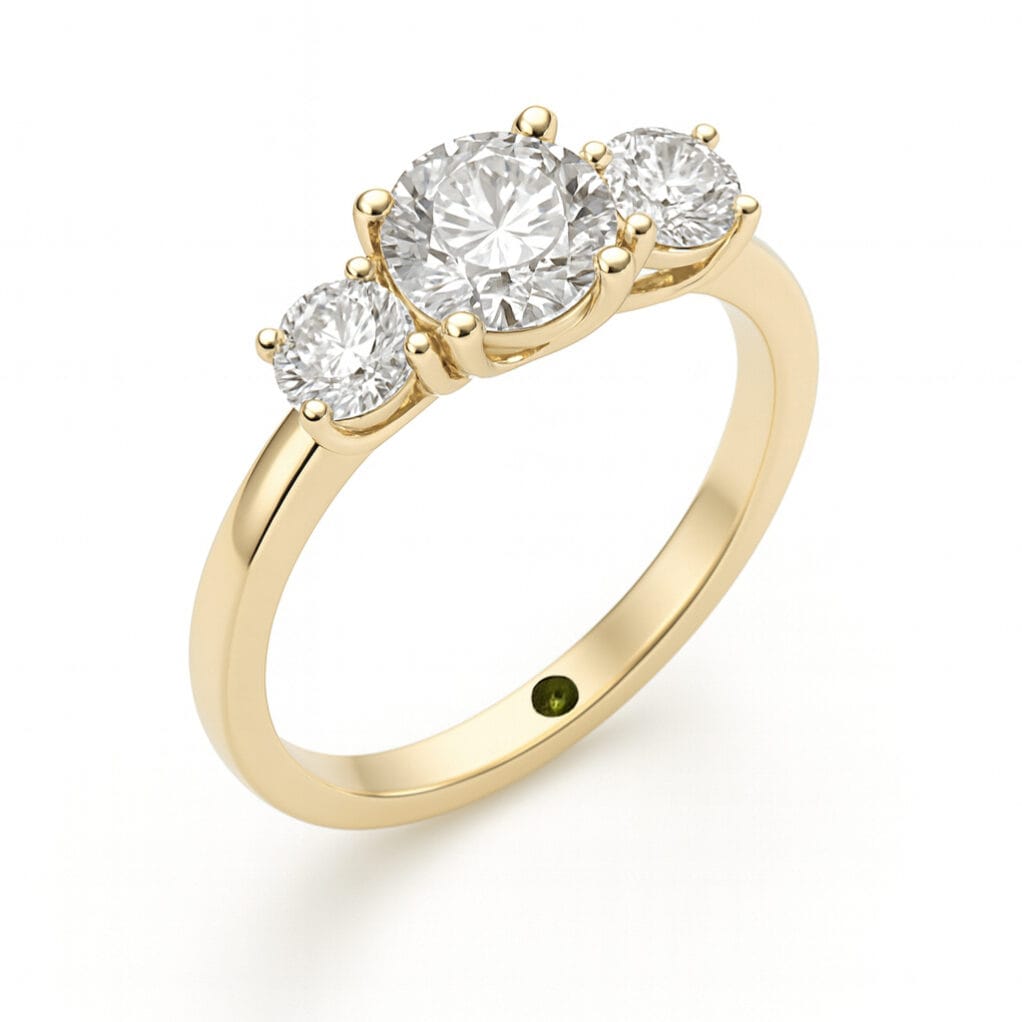
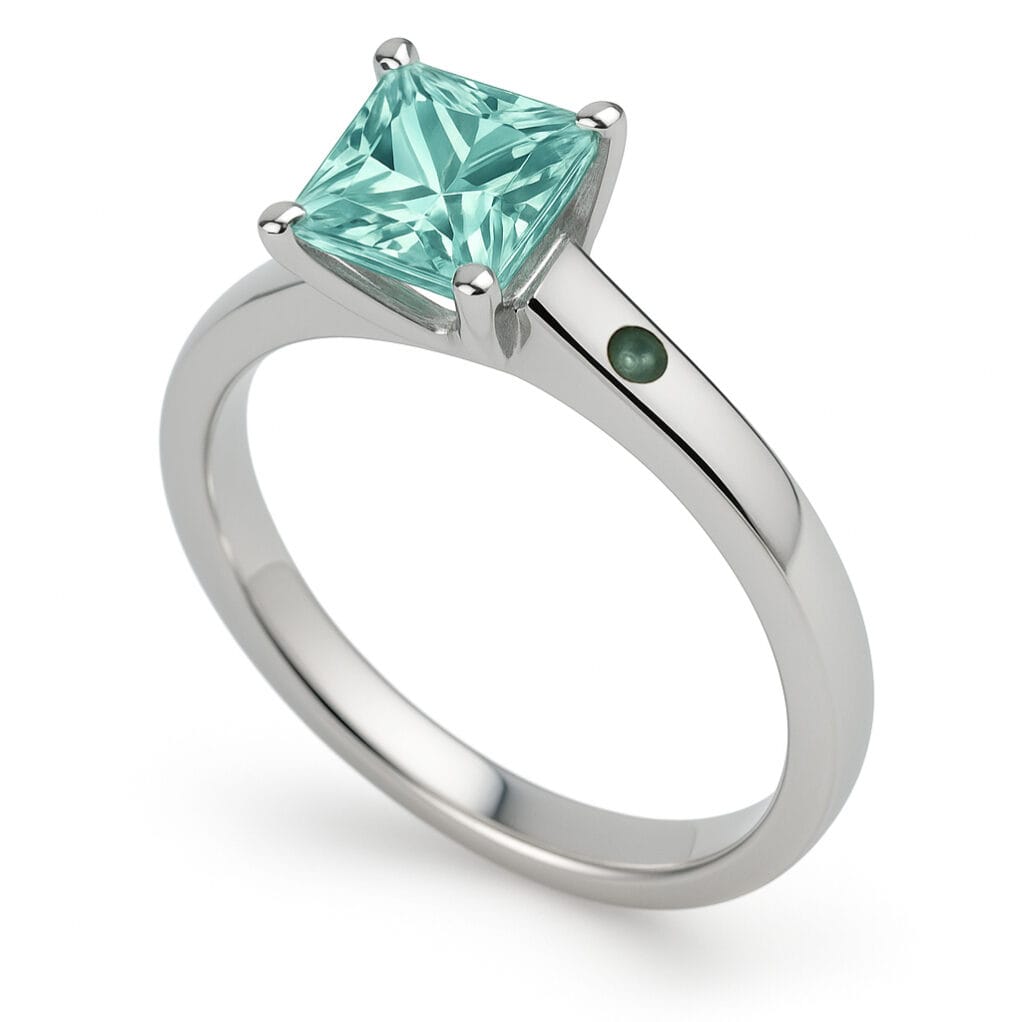
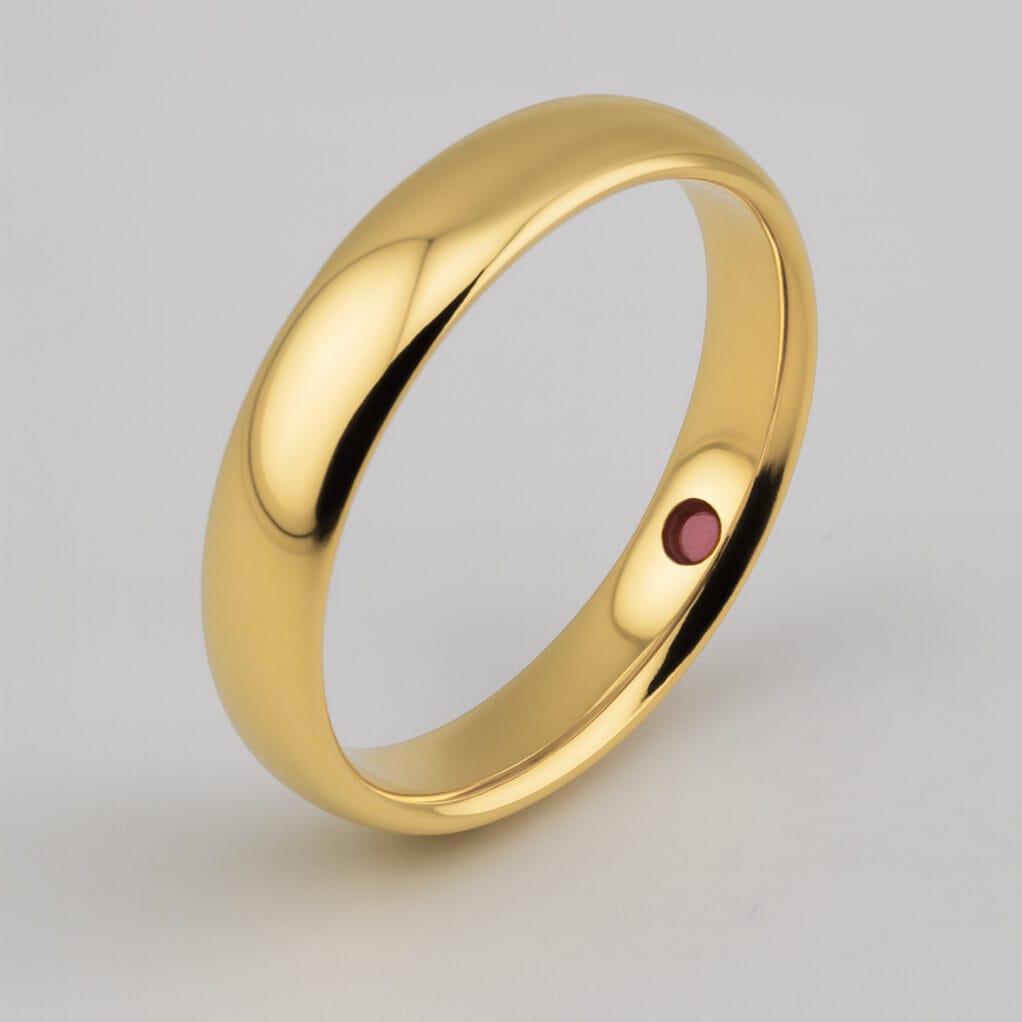
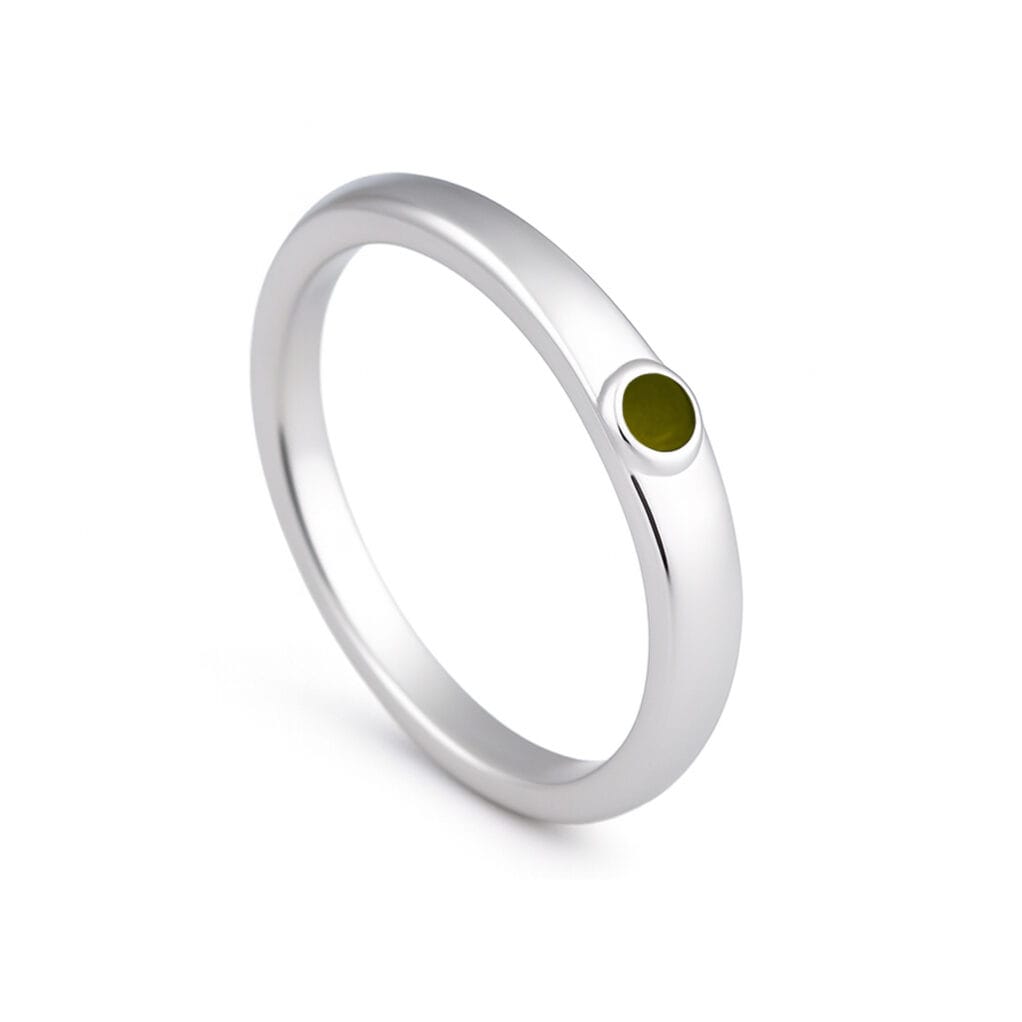
Completed ring examples:
Cellstone color and radiance depend on ring design and lighting; results may differ from the examples below.
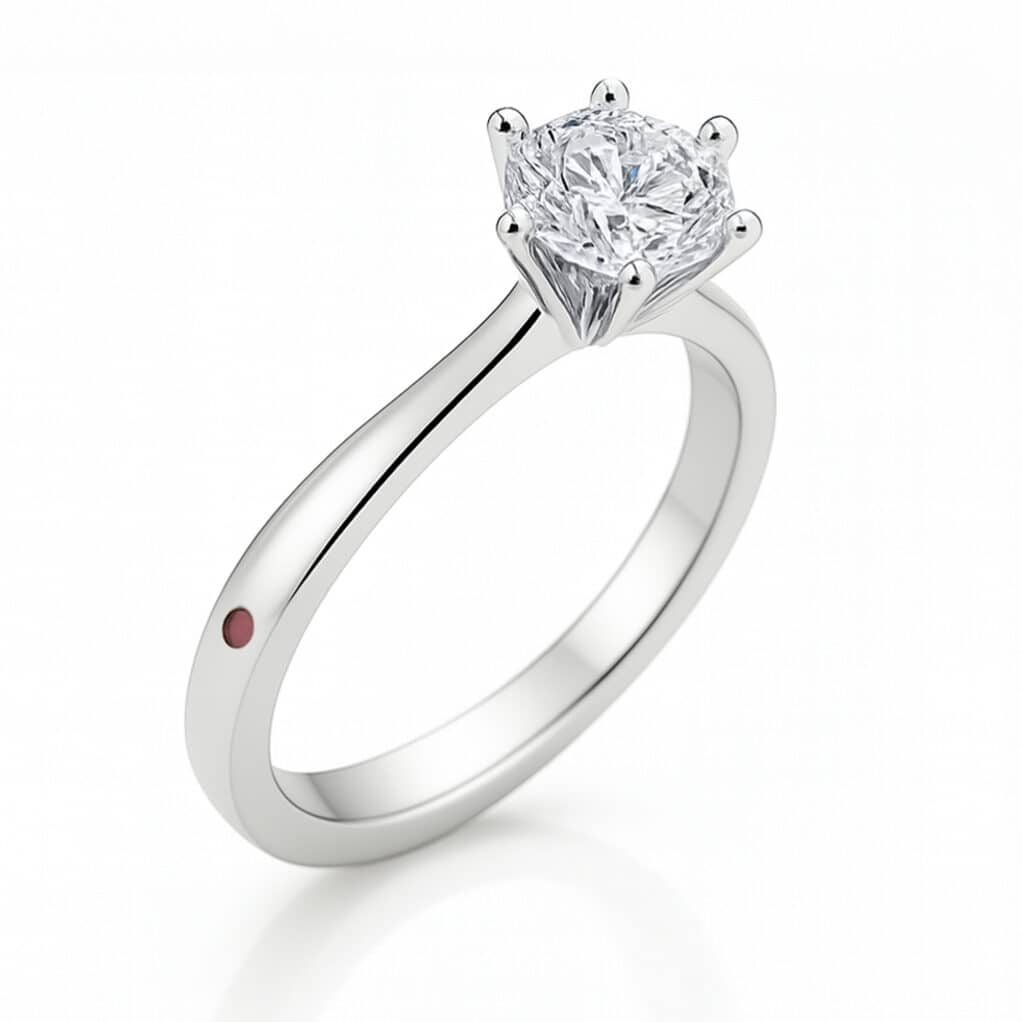
Cellstone Color: Red
Through hole with an edge on the outer side (1/2)

Cellstone Color: Red
Through hole with an edge on the outer side (2/2)
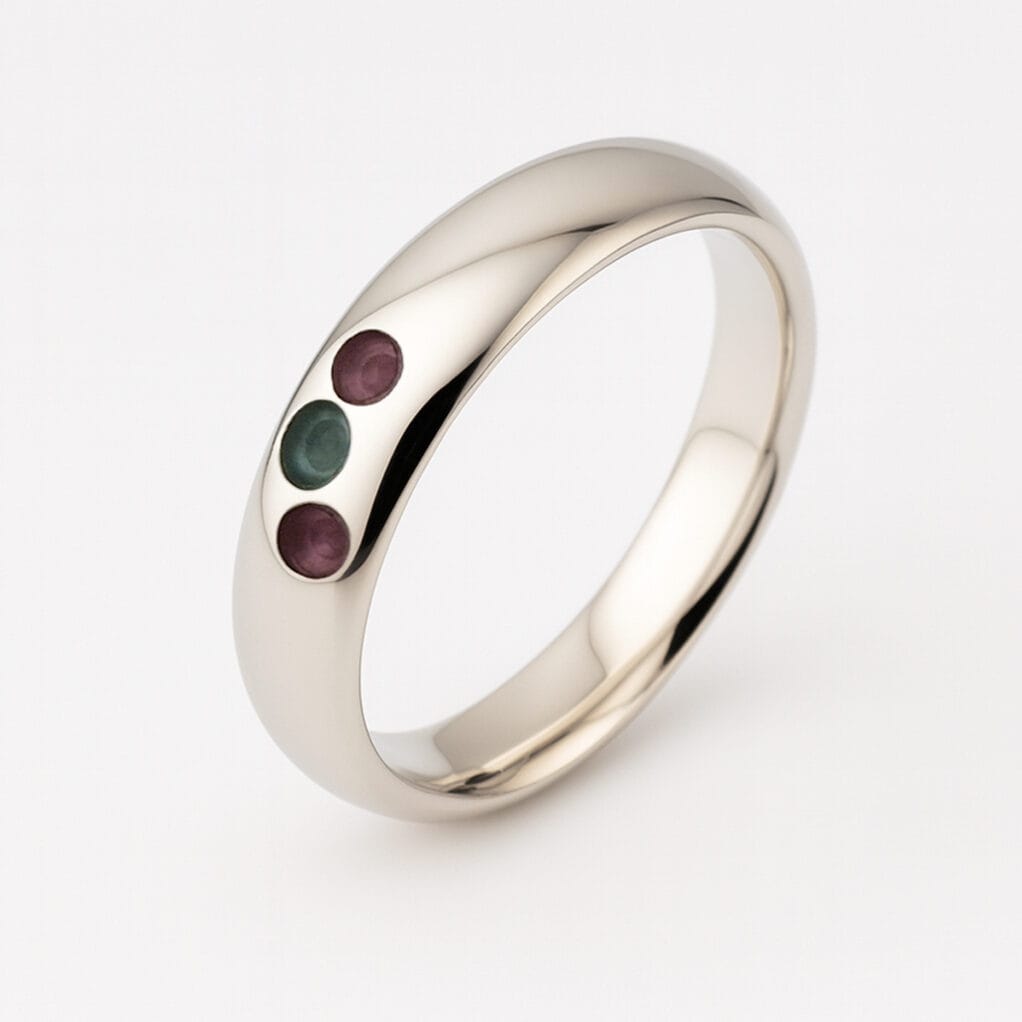
Cellstone Color: Red
Through hole with an edge on the outer side (1/2)
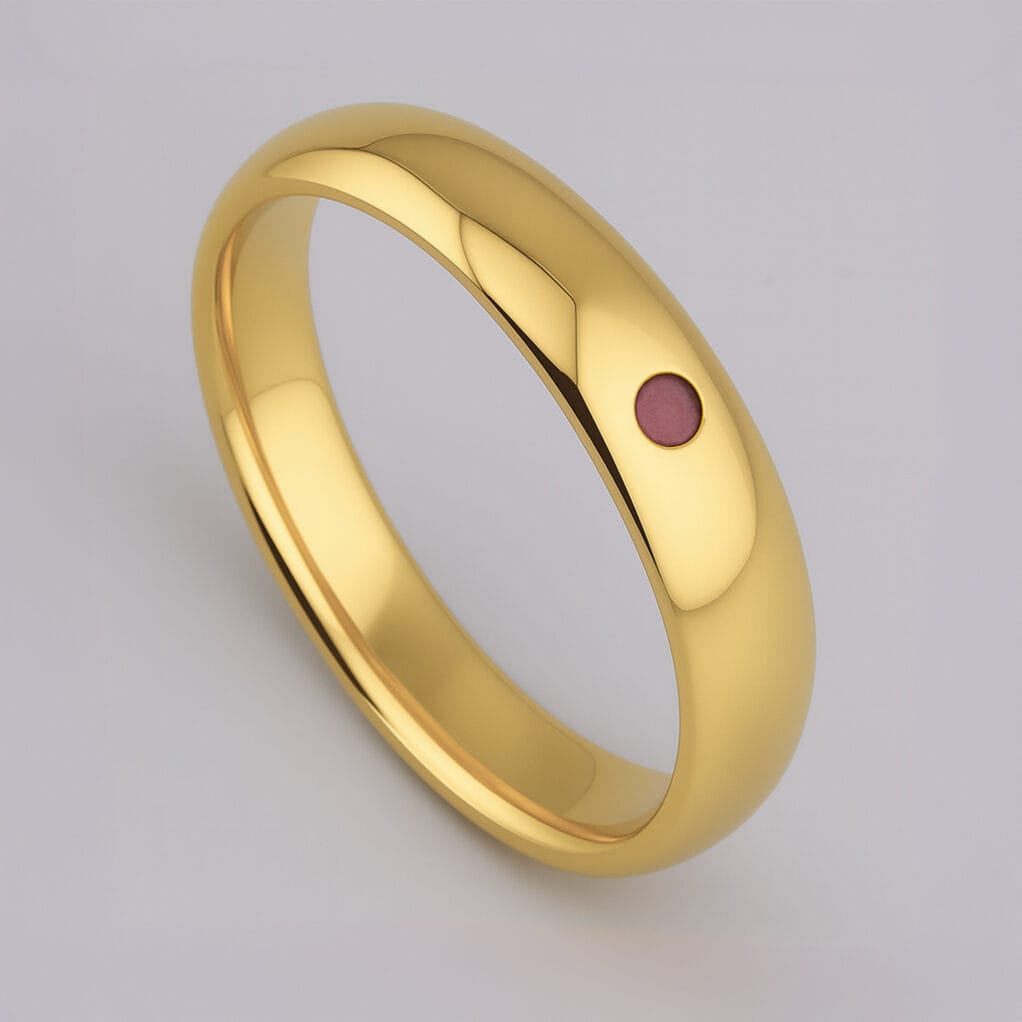
Cellstone Color: Red
Through hole with an edge on the outer side (2/2)
100% Money-Back Guarantee if He/She Doesn’t Love It!
We aim for complete customer satisfaction. So to make your decision easier and avoid any regret, we offer a full money-back guarantee if he/she doesn’t love the Cellstone concept.
If he/she doesn’t like it, any goldsmith can simply restore the ring by removing the Cellstone, inserting new metal, melting it into one piece, and polishing it to a restored state. However, based on our research almost everyone loves it!
For more details, please see our terms and conditions.
Frequently Asked Questions
1. What is included in the hair collection kit?
The kit includes detailed instructions, a collection tube with preservation liquid, tweezers, disinfectant (non-alcohol based), four gloves in two sizes (XL and M, suitable for S, M, L, and XXL hand sizes), a pre-paid return envelope for the tube, and optional numbing cream when purchased.
2. How many hairs do I need to collect?
You need to collect at least 30 hairs with visible roots (white material on the ends). Discard any hairs without roots, as they cannot be used. Please watch our instruction video that shows facial hair epilation as example.
3. Which areas of the body are best for pulling hairs?
For men, facial hair and pubic hair are recommended, as these typically have strong roots (make sure the hairs are short: max. 1.5 cm/0.5 inch). Scalp hair is another option but usually requires trimming after pulling and carries a higher risk of contamination.
For women, leg hair and pubic hair are recommended, as these typically have strong roots, make sure the hairs are short (max. 1.5 cm/0.5 inch). Scalp hair is another option when others fail but usually requires trimming after pulling and carries a higher risk of contamination.
4. What should I do if I can’t collect enough good hairs?
Try pulling hairs from different areas as suggested in the guide. Most people can collect hairs from their face, scalp, legs, or crotch area.
If you still cannot reach the minimum required 30 good hairs after trying other locations, you can send the tube with whatever number you were able to collect. However, please note that fewer hairs reduce the likelihood of a successful outcome.
If you cannot obtain any hair with root anywhere – including chest, belly, arms, or back – we regret that we cannot provide our service for you.
5. How long does the hair collection process take?
The time required for hair collection depends on how many of your pulled hairs contain roots compared to those without.
For example, if 1 out of every 2 pulled hairs has a root, the process will go quickly. However, sometimes it’s also possible that after pulling 10 or even 20 hairs, none have a root. If this happens frequently, we recommend trying a different location for hair pulling.
On average, the entire process, including all steps, should take approximately 30 to 45 minutes. We recommend selecting a time when you can complete the process in peace and quiet for the best results.
6. How can I increase the success rate?
Collecting more than 30 good hairs (maximally 80 in one tube) improves the chances of success, as more hairs with roots increase the likelihood of obtaining enough cells.
Additionally, carefully following all steps and thoroughly disinfecting ensures the best results while minimizing the chance of failure.
7. Does hair length matter?
Yes, hair length matters. Collected hairs should be no longer than 1.5 cm or 0.5 inch, as shorter hairs are easier to handle during processing. There is no minimum length—if you can grab the hair with tweezers and pull it from your skin then that is fine.
Use disinfected scissors to trim longer hairs after you pulled them out, but always ensure you cut the end without the root.
8. How do I disinfect the hair-pulling area and tools?
First, put on the included gloves. Spray the hair-pulling area (for the face, we recommend spraying the gloves and rubbing those on the facial area) generously with the provided disinfectant spray and rub it thoroughly.
Next, spray the tweezers and rub it over the metal. Finally, spray your gloved hands and rub them together to ensure cleanliness.
Wait a few minutes until everything has air-dried completely before proceeding. Proper disinfection is crucial for maintaining sample quality and preventing contamination.
9. Can I use the kit if I have sensitive skin, allergies, or other health issues?
The kit is generally safe to use if you have sensitive skin or allergies. If you tolerate normal hair epilation (pulling out hairs), you should be able to use it without problem.
If you are unsure about the included disinfectant – which is non-alcohol and water-based, containing didecyldimethylammonium chloride (<1.0%) and alkyl (C12-16) dimethylbenzylammonium chloride (<1.0%) as active ingredients – test a small amount on your skin. Wait for at least one hour to check for any reaction. If preferred, you may also use your own disinfectant. When in doubt, consult your doctor.
For individuals with skin or immune disorders, it is essential to consult your doctor first to ensure that hair epilation is safe for you.
The kit includes an optional, purchasable numbing cream for added comfort. Do not use this cream if you are allergic to lidocaine, prilocaine, or epinephrine. Always consult your doctor if you have concerns about skin sensitivities, allergies, or other health conditions before using the kit.
10. Where is the best place to use the isolation kit?
We recommend using the kit in a bathroom equipped with a toilet and sink. For example, you can place the tube on the sink and sit on the toilet (with the lid closed) while pulling and collecting hairs. For facial hair, you can use the mirror and sink. This setup provides a clean, comfortable, and organized space for the process.